Showing posts with label Montessori infant. Show all posts

Sunday, 21 August 2011

Evolution of a room

I was reading Kylie's words here, in her wonderful post about her son's room.  And what she said struck me.
I love to see bedrooms and nurseries especially those of the Montessori kind. But most of all I like to see them after a little use and to see how the have grown.

She is so right! It is really interesting to see other Montessori inspired room, but to see it's evolution really talks a whole deal more.

I want to share with you this evolution, and if you feel like it, join me along, and post, on your blog, the evolution of your rooms.  You are very welcome to leave a message here so that we have a big pool of really nice Montessori inspired bedrooms in evolution to look at!

What started out like this:


yes, we started with a rocker, but only for a few weeks.  It is a heirloom that I wanted to have the chance to use.  I did so when we moved here, because family history really speaks to me.  These were taken 3 days after we moved.  And it became

 this 2 weeks later... :
for my 5 month old:

a new floor bed


a corner dedicated to toys and books
and a changing table with images to enhance the changing experience...

 for my 8 month old:

a new book corner with few books and a chair to sit by
 a new play corner with cubbies made by daddy and images that changes ever so often
and a new clothing area that is more open and accessible

And as a 11 month old

a new table to play on just right by the cubbies


the bed area did not change during all this time


and finally for my 1 yo:


Please, join me for this show and tell, and don't forget to link to it by commenting.

Thanks for looking!

Monday, 11 July 2011

The gravity table

Meet an old lego table that we received last summer. My kids are not fans of legos, and my husband could not understand my interest in such a table when it was offered to us. But I just saw the potential of this, a table with a central hole? There is just something to do with this for sure.


And so came the first idea came after seeing E test the consistency of gravity by dropping food beside his chair, and looking at it fall. I felt the need to redirect this activity for the sake of my floor, my own sanity, and the obvious necessity for E to do it, and this is where the table comes into play


I just need a few items to drop, the table, and a basket to receive, my best find is still an old laundry basket.
As for the items to throw, I have been using pretty much anything, blocks, stuff toys, stuffed blocks, nature things of all kinds that cannot break.

The table is just the right height for him to lean on it, and be able to look in the hole, to his great satisfaction! So he drops whatever he wants in there, and looks at it in the basket through the hole.

After I showed E to pull the basket, and retrieve whatever item he wants to drop back.

Needless to say it is a winner
AND
the dropping at the table has noticeably diminished.


L'an passée, on m'a donné une table de légo de seconde main. Quoique les légos ne soient pas un très grand hit ici, j'étais complètement emballée envers cette table à la grande surprise de mon conjoint, qui ne comprenait pas mon enthousiame évident. Une table basse avec un trou en plein centre? C'est certain qu'il y a quelquechose à faire avec ça.

Et le premier quelquechose m'est apparut comme évident lorsque j'ai vu E tester la gravité pendant un repas. Il prenanit un morceau de sa nourriture, se penchait au dessus de sa chaise, le laissait tomber, et regardait ce qui arriverait. J'ai tout de suite compris que je devais rediriger ce comportement, le plus tôt sera le mieux.

voir image 1

J'ai donc trouvé des objets, qui pouvaient être laissé tombé dans le trou de la table, ainsi qu'un panier pour les lancer dedans, j'ai fini par prendre un vieux panier à linge. Pour ce qui est des choses à échapper, j'ai utilisé un peu n'importe quoi, et je crois que ça rend l'activité intéressante.
voir image 2

La table est just la bonne hauteur, pour qu'il puisse rejoindre le trou, et également regarder dedans. Alors après qu'il y ai échapper un objet, il se penche par en avant, et le regarde par le trou. Lorsque tout les objets ont été lancés, il tire le panier pour ramasser les objets qu'il désire refaire tomber.

voir image 3

C'est un succès , il adore

ET

il jette beaucoup moins sa nourriture par terre

que dire de plus!

Saturday, 9 July 2011

Kitchen organization part 3 - E's space

E's newly acquired independence is one of the biggest factor that motivated me to do this move. I realized that our old setup was not safe for him since he had easy access to glasses, and breakable plates and bowls.
But what really got me going is the fact that I realized that he was sometimes thirsty, but failed to ask (or to make us understand that he needed a drink). And so came the idea of having a spot just for him. At first, I thought about giving him the entire drawer that was devoted to my 2 oldest. But because of the very nature of a drawer, he couldn't see his sippy, and was asking for a drink, rather then go for himself. I wanted to find a way to display his things, so he could see them easily if he needed them. And so came the idea of the shelving.

My objectives here were to have him be able to help himself for a snack and a drink, and put his plates and utensils within his reach so that when he is able to walk, he can star helping us set the table with his own thing.

E's shelf now reside under our kitchen counter. This was a lost space. And as you can see, it is really near his independence chair and our kitchen table. At the same time it is just at the entrance of the kitchen, so I am really happy with this emplacement. (the kitchen is behind me in the photo)

1. étagères sous le comptoir


On the shelves I added the bare minimum. His bowls, and utensils on the first shelve, his sippy cup on the second and a soon to be ready pile of little cloth to clean the table. Finally on the third row, there are his snack bowl, and a spot lest empty to put a basket for carrying once E starts to walk.

2. Contenu des tablettes


A word on snack bowls and sippies:

E learned to use a sippy a few weeks ago, when we left for our trip. He had never used one before. And he still doesn't use one 99% of the time. The only time he does is when he drinks on his own. The sippy will dissapear as soon as he is able to pour himself a drink. But at the table, he drink using the gin glasses shown here

Snack bowls: There are 2 of them. The one with the handle contains cereals. There is a lid on the top that is slit many times to retain (well as much as it can) the food within the container. It does work to minimize spills. But again, I only put cereals in there. The second container is a bowl with a snap lid that is rather easy to open and close. I showed him how to open and close it before I left it on the shelf. I usually put finger size bites of veggies and things that can be there for a few hours at a time. When it is empty, (I normally) don't leave it there.


L'indépendance que E démontre et qui augmente de jour en jour est la cause principale des modifications que je devais apporter à la cuisine. Puisqu'il avait accès au tiroir que j'avais organisé pour les plus grand, et que celui-ci contenait de la verrerie ainsi que des assiettes en céramique, je devais déplacer le tout pour assurer sa sécurité. Par contre, une autre point a été la goutte qui a fait débordé le vase: le fait que E avait souvent soif, mais ne demandait pas à boire (ou ne parvenais pas à se faire comprendre). J'ai compris qu'il était donc important qu'il soit en mesure de répondre a ses besoins lorsque ceux-ci se faisaient sentir.
J'ai tout d'abord voulu utiliser le tiroir pour y mettre ses choses. Mais un tiroir étant ce qu'il est, il ne voyait pas en permanence son gobelet, et l'oubliait lorsqu'il en avait besoin. Ça devenait donc évident que je devais trouver une solution qui permettrait que ses choses soient à sa vue, d'où l'idée du meuble.

(Voir image no 1)

Le meuble est sous le comptoir de cuisine. C'était un espace perdu de toute façon. Il est situé tout près de la table à manger et de sa chaise. En même temps, il est juste dans l'entrée de la cuisine, donc un emplacement parfait.

Sur les tablettes, j'y ai mis le minimum. Sur la première tablette, ses bols et un panier d'ustensils en bois. La tablette du dessous est pour son goblet d'eau et les chiffons (qui ne sont pas encore tout à fait prêts). Et finalement, la dernière tablette loge les collations et un espace laissé libre pour un panier d'osier a poignée pour transporter ses choses à la table, lorsqu'il sera capable de marcher.
(voir image 2)

Une note sur les collations et le gobelet.

E n'a appris a boire au gobelet que tout récemment. Le goblet n'est utilisé que pour être laissé sur la tablette et lui permettre de prendre une gorgée lorsqu'il a soif en dehors des repas. Au repas, il boit avec les verres en vitre vu au dernier billet. Sitôt qu'il sera en mesure de se servir lui-même à boire, le gobelet disparaîtra.

Il y a 2 contenants de collation. Celui avec les poignées a un couvercle coup en forme d'étoile qui permet a une petite main de rentrer dedans et prendre une poignée du contenu, sans que celui-ci n'en sorte si la tasse est échappée. Ça fonctionne relativement bien. Ce plat là contient seulement des céréales. L'autre est un contenant avec un couvercle hermétique qui y est fixé. J'ai montré à E comment l'utiliser avant de le mettre sur les tablettes. Celui-ci contient généralement des petites portions de nourriture à manger au doigts comme des légumes, qui peuvent rester quelques heures à la température pièce

Monday, 20 June 2011

Making a object permanence box with interchangeable lids


I used a wooden CD box found at my local craft store (in the painting section)


- I removed the hinge lid to keep just the base of the box. I thought about using the cover to make a drawer, but I just didn't have enough time to make it work.

- I used a saw to make the a rectangle in one of the sides of the box. This is the place where E can retrieve the ball (or form). Make sure that the rectangle you cut out is big enough to enter a hand and get it out with the shape in hand (I almost made it too small!)

- then I nailed (with finishing nails and a nail gun) some narrow wooden sticks (found at the hardware store) just near the upper side of the box. These are necessary to hold the interchangeable lid in place within the box.


Make sure you leave a space between the wooden sticks and the edge of the box for the cardboard to fit in the box. You don't need a big space, just to cover the thickness of the carboard (so that it lays flat vs the edge):


On one side, I sanded the egde all the way to the wooden stick so that my cut piece of cardboard will be able to slide in and out (this is what will allow me to have an interchangeable lid). I used a rough piece of sandpaper to sand the whole area. I sanded the front of the box, but I could have make this in the back.


- then I just cut a square piece of cardboard using the dimensions of the inside of the box, using an x-acto and a self healing mat and I also cut out the shape in the cardboard and now my box looked like this after putting this piece on the top of the box:


(It could be used that way, and it was for a couple of days, but since the cardboard lid is not fixed and just put on, I wasn't happy with it. So I managed to find a way to fix it there.)

Using the self healing mat I made a 2 cm large square, using the dimension of the OUTSIDE of the box


and I nailed it over the top of the box:


(note: on this picture, the square is not nailed yet, but it is placed correctly)

THis last piece of cardboard holds the interchangeable lid in place, and soE cannot remove it as he was doing at first. So now he can concentrate in really putting the shape in the hole. the interchangeable piece of cardboard (the one that is under) can slide out in the front of the box: this is the side I had sanded. **Don't forget NOT to nail this side of the box with your square piece!**

I have 2 other shapes ready to be used:


and I am planning on making more lids, with multiple shapes on them

I am super happy with the result and E is over the moon with this activity


Pointing at the start of conversation

Conversation starts at birth. Although unspoken, any mom knows that there are many "words" said in the minutes following a wee one's arrival: through touch, looks, sounds, and yes, words from mom's and dad's mouth. I can say, when looking back at real pictures and the ones engraved in my memory, that my children all had something to say when we first met them, and what they had to express was strong.

But conversation is something that needs to be practice and fine tuned. The child needs to learn how a conversation works, what it does, and how important it is. And this is being done firstly through the signing, the eye contact, the responding to cues and calls of an infant.


Montessori defined a sensitive period for language starting during the first year (that goes on to the 4-5th year). The child at that point needs to hear voices, real ones in order to understand and absorb language. We all have heard of the child that was raised in the jungle amongst monkeys, once back into civilisation, was never able to talk (and walk) properly. He had missed the window of language. Of course, this is an extreme case but I think it really show the power of the sensorial periods and the urge for the children to work through them.

E is entering a new phase in language development. He is very much wanting to talk to us. To have this conversation we have been practicing for a while now. And although he still says no word, we sure understand what he is saying! This started at the same time as pointing. Well, I think pointing is what started it all actually. That really was an incentive for us to name things, things that we know he has seen or has an interest in. And that led him to answer by trying to imitate what we say: when he points he babbles and has different intonation in his voice. So we are practicing conversation with him. And it is SO fun!

How to help them in this area? Here is what we are doing:

  1. Answer, using a tone that matches his own
  2. Name what he is pointing at
  3. Point ourselves to things we want to him to take notice into
  4. Get closer (if he is in our arms) or let him go closer in order to be able to touch, explore or connect with the thing/ person he is pointing at
  5. Make sure we make eye contact if possible (because we value eye contact when we talk)
  6. Let him watch a conversation (between 2 person) AND also let him interact in it if he wants to
  7. Make sure we read books and look at many images that we name to expend his vocabulary (the one he sees...). Words being the basis of conversation, it is important to expose our children to all words big and small but most importantly correctly said


10 favorite activities for my 10 month old

We are back from our vacations, and we had such a good time. It gave me time to get my mind of things and take more time with my children, enjoy ourselves and relax ( well, as much as we could).

I was surprized upon my returnal how E's interests and capacities have changed. So to celebrate his upcoming 11 months, 10 activities for my 10 month old boy (who is clearly growing too fast!)

1. Pointing at


This is a relatively new attraction for him: pointing. He likes to do it everywhere, at people, at plants, at cars, at himself through the mirror. And when he does, he blabbles loudly! We are seeing this as the start of the 2 way conversation, something he has been working on since his first day of life. More on pointing and conversation tomorrow

2. Stacked books


Upon arriving to my room to a scattered pile of books many times, I finally got that he just loves to unpile AND turn pages of a book. So I piled many of his own books in his room for him to manipulate. He undo the pile, and then turns endlessly all the pages of all the books. That can really grab his attention for a while.
I have also given him some old paperback books for him to practice turning the pages gently. (not shown in the picture)

3. Colored water bottles


He is drawn into colors. I saw this idea somewhere on the net, and loved it. So I made up 3 bottles of colored water, using the primary colors only. He usually plays this more outside then in, since when the sun light them up, the colors really sparks. His big brother mixed the water and color, that was also a fun experiment for him too.

4. Family pictures

I have printed and plastified family pictures. They are in a basket accessible to him in the living room. He LOVes taking them out, and looking at them. Perfect activity or the pointing stage he is into. When he points, we name the person. We have also started to ask him to point to a picture. He is really getting good at this!


5. Permanence object box


I wasn't able to justify to buy just a permanence object box, and the ones with the interchangeable forms were just out of my price range. So I made one up using a wooden CD box. I removed the lid, and made a hole on one size. For the interchangeable cards they are made out of thick cardboad (using an x-acto knife), and used wooden cutout shapes I already owned. VOila. He loves this, and plays over and over and over again, when my 2 oldest are not using it...

6. Bongo, Tam tam, and tapping


This little man sure loves rhythm! Anything he can tap on, he will, including the kitchen bin when he manages to open the kitchen cupboard to reach it. Clapping hands is also a favorite of his. Just put on some music, and he is off!

7. chasing Peek a boo.

THis is still going strong here. From silks to living room shades, this games gets played many times a day. But right now, he really preferes catch me peek a boo, which consist of running to hide in a corner of our home or behind a wall and call him. He just gets so excited when he finds us, and says "ah!"

8. The discovery basket

this really is endless fun!

9. Sand

Summer is at our doorstep, and we are finding ourselves more and more outside. Sand really is a texture he adores. A couple of buckets, a sand shovel, and a god sun hat is all he needs for hours (litterally) of fun

10. Blocks and basket

He has finally started to put in, and not just get out. I have put at his disposition a basket just to put things in. But his favorites right now are blocks. I have also seen him outside putting grass in a small teacup used for outdoor pretend play kitchen, and just about everything he finds on the floor, in just about anything he finds on the table, or in drawers.


Monday, 9 May 2011

Le panier aux trésors


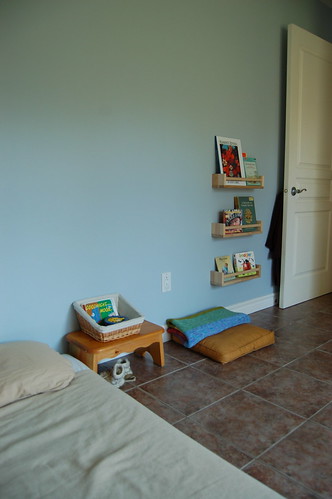
À mon humble avis, le panier aux trésors ou panier de découverte est LE meilleur item pour le NIDO. C'est le meilleur investissement ( et probablement la moins dispendieuse), l'activité la plus souvent utilisé, celle qui captive l'attention de E le plus longtemps, et celle auquelle il retourne le plus souvent.
In my humble opinion, treasure baskets are the best items for the Montessori baby. It is the best investment, the activity that is most often used, that keep the attention centered for the longest time, and that is returned to oh so many times.

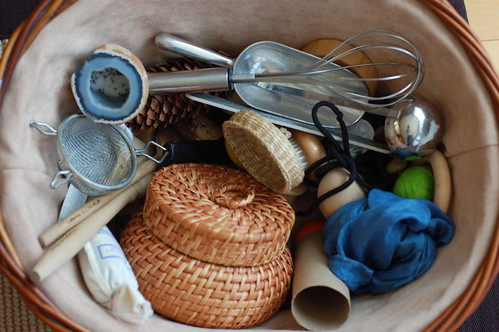
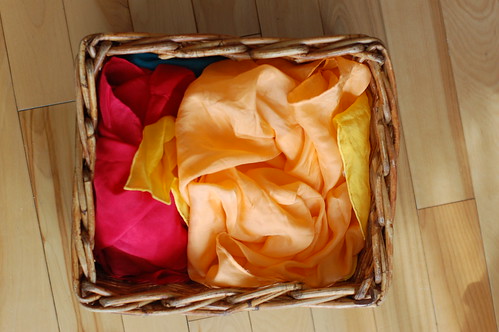
Préparer un panier aux trésors est facile. Pour la majorité des items, il ne suffit que de fouiller dans les tiroirs de la cuisine, salle de bain, d'aller faire un tour à l'extérieur et trouver des items intéressants qu'offre (gratuitement) la nature, et de mettre le tout dans un panier. Le reste, n'importequel bébé curieux (et ils le sont tous je crois) s'en occupera.
Preparing a treasure basket is easy. You just have to look through out the house and gather objects that will be interesting for a baby to discover. Kitchen drawers, bathroom utilities, nature walks are excellent places to start. As for the rest, any curious babies will take care of :)

Certes, il faut faire preuve de prudence en montant le panier: ne pas utiliser des choses coupantes, des objets trop petits que l'enfant pourra avaler, ou des matériaux qui contiennent des produits nocifs s'ils sont mis dans la bouche. Le panier devrait toujours être exploré avec une supervision des parents ou d'une personne responsable. Mais tous ces avertissements valent largement la chandelle: un bébé occupé à découvrir son univers avec tous ses sens.
It is important to be careful through out the process. Choosing wisely is important. Objects that can be sharp, or too small or made of chemical products, should not be used in the basket. The basket should also be inspected for broken items regularly. When in use, a responsible person should be present at all times. But all of these warnings are really worth it! Allowing baby to discover its world with all his senses is just fantastic.

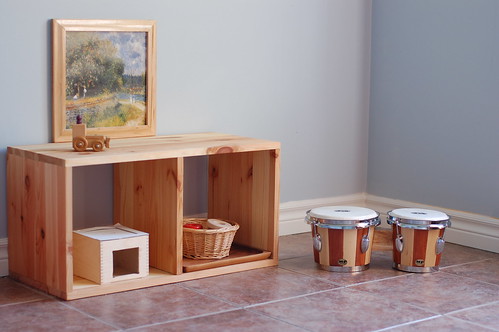
Quoi mettre dedans? C'est à mon avis la partie la plus intéressante.
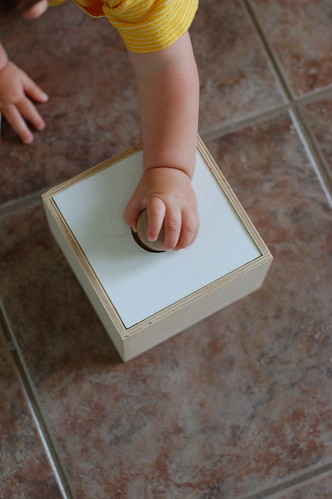
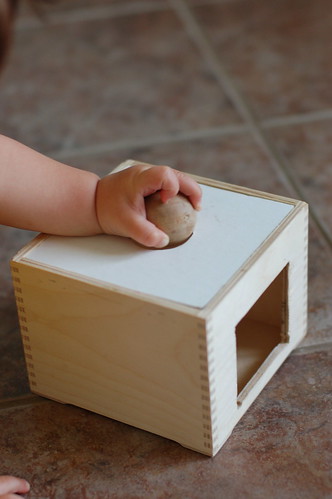
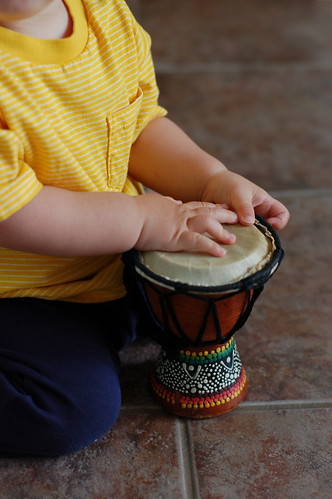
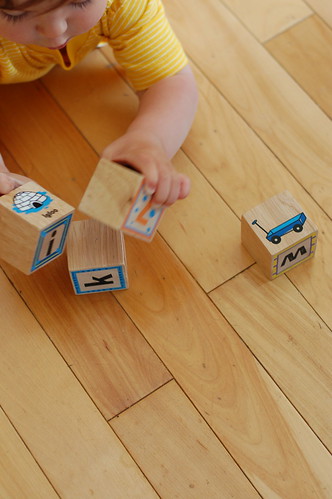
Ici, j'ai commencé avec des objets simple présentés par "sujet": cuisine, salle de bain, nature...des cuillères de bois, des tasses à mesurer, une éponge, une roche, des coquillage... Des choses simple de texture différente. Puis après avoir fait quelques rotations de panier, et lorsque j'ai vu que E semblait être prêt pour plus de matériel, j'ai mélangé les objets ensemble. A ce moment, il avait plus d'items à découvrir (et certains a redécouvrir puisque quelques semaines étaient passée depuis qu'il les avaient vu dans le panier) et à ce moment, je l'ai vu faire autre chose avec les trésors. Au lieu de seulement les explorer (lire mettre dans sa bouche bien souvent), il tappait avec un objet sur un autre, ou tentait d'ouvrir les boites, de mettre dedans, de retirer ce que j'avais caché...il manipulait les choses avec un tout autre objectif. Et à ce moment j'ai vu l'importance de mettre des objets qui peuvent avoir plusieurs fonctions: pour taper, cacher, empiler...Alors dans votre recherche pour trouver les objets de votre panier, gardez ceci en tête. Ce n'est pas seulement la texture, la forme...qui compte, mais aussi ce qu'il/elle pourra faire avec.
What to put in? That is the best part IMO!
I started to use simple objects classified by "topics": kitchen, bathroom, nature... Simple objects with different natures, shapes, color, texutre, temperatures. I rotated these different objects until E seemed ready for more items at a time. Then, I mixed everything together. He then had more to explore, or re-explore, since some of those items had been out of the basket for a couple of weeks. Then, I noticed that he was using the objects differently. Instead of just mouthing them, he was using them to tap together, to pull things out, to put things in, to hit with...And so then, I saw the importance of putting objects that could have more then one fonction: box with lids, toilet paper rolls (since you can put something inside the roll...)...items with which you can pile, tap, hide...so when looking for your basket objects, keep that in mind!

En tant que parent, après avoir choisit les objets constituant le panier, votre rôle n'est plus que d'observer.
Le panier peut toujours être mis a jour. Quand un item ne semble jamais intéresser l'enfant, il peut être retiré pour faire place à autre chose. Quand le panier ne semble pas intéressé l'enfant pendant quelques jours, c'Est peut-être signe qu'il est temps d'ajouter de nouveaux objets qui piqueront à nouveau la curiosité de l'enfant. Mais ceci demande de savoir observer, à la manière Montessori.
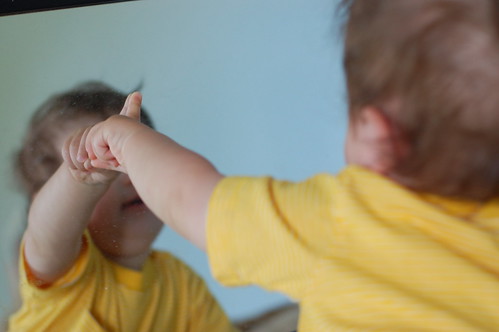
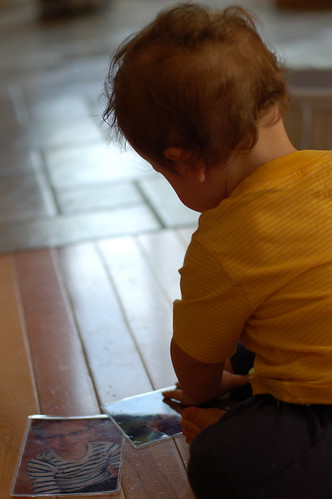
Il est difficile de ne pas déconcentré l'enfant qui regarde son panier, lui montrer les choses, lui ouvrir les boites qui contiennent un objets intéressant. Mais la fierté de l'enfant qui fait seul, l'expression de son visage lorsqu'il réussit à ouvrir, et trouve quelque chose d'autre vaut toutes les fois ou on repousse l'envie de l'aider.
As a prent, after putting your basket together, all you have to do is observe. The basket has to be updated regularly. When an objects doesn't seem to be interesting for the child, remove it or exchange it for something else. When the basket seems to have lost the child's interest, it is maybe time to change many items in there, or change it's location. But all of this implies that you have to observe the child, the montessori way.
It is easy to disturb (and sometimes so tempting!) the child that is busy with his basket. But the smile in his face when he does it himself, the delight of finding the way to open a box, or to discover an hidden object is well worth the effort of not disturbing.


Voici quelques article intéressant sur les paniers aux trésors (en anglais):
Some interesting article on the topic:

Treasure basket 2 for toddlers


And ideas:

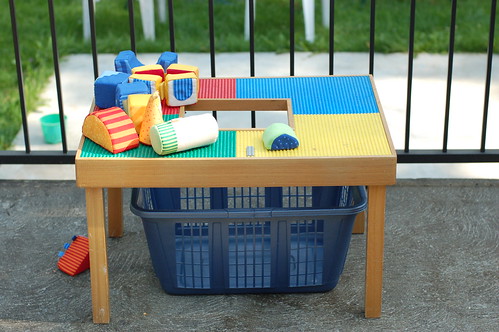
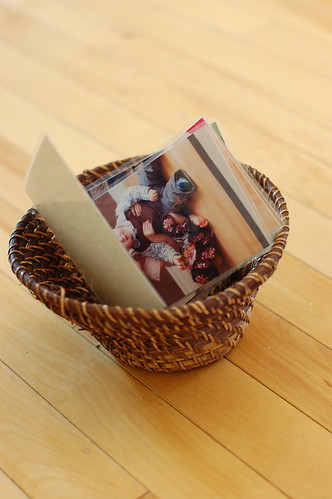
Une idée de panier aux trésors ( qui peut être acheté) : ici
Une idée de Sew Liberated
Plein d'idées ici
D'autres idées encore
et pour la suite, un panier de découverte pour bambin qui peut facilement être fait à la maison! C'est une idée fantastique! ( le panier me semble être un panier IKEA) Et quel beau cadeau pour un enfant de 1 an! (c'est sur ma liste :) )
This last one is a discovery basket intended for toddlers. I adore this idea, and it is definetly on my list for E's first bday. Easy to make at home (I would totally use an Ikea divider for it) and looks so enticing for the young curious child in need of exploration!

Bonne découverte!

Happy basket!

Tuesday, 12 April 2011

Texture book


Pumpkin really is into texture lately. He loves to touch, put in his mouth, touch, put in his mouth...you get the idea.
Mon petit dernier adore toucher dernièrement. Toucher tout, toutes sorte de textures, et bien entendu, les mettre dans sa bouche :)

Not being in love with the texture book on the market, where you feel fake fur or fake crocodile skin, I rather have a book with just texture that are not associated with something else that is not entirely true. And so came the texture book idea.
N'étant pas une fan des livres de texture qu'on retrouve présentement sur le marché, je préfèrais quelquechose qui n'associerai pas une texture fausse à quelquechose ex.: de la fausse peau de crocrodile à une image de croco.) Alors, l'idée m'est venu de créer un livre de texture qui n'associerai pas les textures à une image, mais qui ne serai seulement ce que c'est: des textures.

For this one, I used fabrics. All sort fo fabric of a similar color in order to isolate the touch feeling (otherwise you get color and touch). Granted it is not perfect, as it is rather hard to find all similar color fabric in a variaty of texture, but I am still happy with the result
Alors pour le livre, j'ai utilisé des tissus. (J'ai tellement d'autres idées dans le même genre, il y aura certainement une prise 2) CE sont tous des tissus différents ou point de vu du toucher, et j'ai tenté d'isoler cette variable en essayant de faire disparaitres les autres. Tous les carrés ont la même formes, ils sont tous (à peut près) de la même couleur, et sont cousu de la même façon dans le livre.

I found a little cloth book at a scrapbook store near by.
j'ai trouvé un petit livre de tissu dans un magasin qui vend des produits de scrapbooking près de chez moi


I removed all the metal things that were hasardeous,(the book was binded with rings) and cutted little rectangles of fabrics.. I sewed them at the same time ( so you have to be rather precise in positioning the swatches so that the sewing lines are straight) with my sewing machine.
Après avoir enlevé tout les petits morceau de métal qui pouvait être dangereux, J'ai cousu les petits carrés de tissus à la machine, recto et verso en même temps. Il faut donc être très précis quand au placement des carrés pour que les lignes de couture soient droites.

Then I added bows to bind the book and voila.
J'ai attaché le livre avec des boucles, et voilà


I used many fabric: coton, linen, velvet, silk, rayon, wool, burlap, hemp (fleece) , corduroy, coton terry
J'ai utilisé plusieurs tissus: cotton, velour, soir, rayonne, laine, jute, Chanvre, velour côtelé, ratine

instant succes, he loves patting the pages, and of course, putting it in his mouth. His sceal of approval I guess.

C'est un succès assuré, il adore toucher les pages, et surtout, les mettre dans sa bouche...


Wednesday, 6 April 2011

April activities - Montessori 6-12 months old

Pumkin now being 8 months old (!!) I want to start listing monthly activity for him, as there are not tons of info about this phase on the web.

Moving:

We are in a big motor skill phase. He has been crawling for a while now, and even sometimes walks on all fours. We also have seen him pulling himself up a couple of time over the last few days.


Any pile of laundry, cushions, pillow is a big hit right now. He loves climbing it back and forth. So I have set some blankets and pillow both in the living room and in his room for him to climb in.


he is also using everything he can find to pull himself up. I am seriously thinking about installing a bar in his room for him to pull himself up.

In his hands:

Eggs and cup

It has been presented yesterday and he loves it.

He is now working on his table with his chair.


Single post and wooden rings


music basket

He LOVEs that!


silk basket

Perfect for the starting of the putting in and out phase, and also peekaboo

texture book

I'll talk about it in a separate post


Clothes:
he loves to play with socks and other clothins items

Opening and closing drawers:
we are well on our way for that. (with everything that will come with it...)


On the wall:


Van Gogh

Looking at:

this month's favorite seems to be this french book. It shows differents artworks and has a little poem that accompagny it

We still have on the shelves the very hungry Catterpillar, and a animal photo book

He loves flipping through them, as much as listening to the story

In his ears:

Classical genre

We are playing a lot of Mozart this month. We have classical music in every room.

Of course, lullabies and other songs sung by us are always present !