Showing posts with label Montessori Handmade. Show all posts
Monday, 27 August 2012
Addition tables
The operation tables were not something I wanted to buy. I felt they were easy enough to make at home, and I am completely happy with the results!
I used JMJ publishing's file (which doesn't seem to be working tonight, it seems to happen regularly lately), and printed it on label paper size 8 1/2 x 11.
I had DH cut out a wooden panel the same size as the tables, and sticked the label on it. (it holds very well)
Then to protect the label, I use plastic book cover (the one that is on sale everywhere now, for all back to school event...) to cover the tables. It takes a little practice to put on properly but after a few tries, it becomes super easy.
And voilà, addition tables. I like the feel better then a plastified piece of paper.
This is their current location, behind the boxes of equations (also from JMJ publishing) and the tiles for the addition board (located just behind the tables)
Tuesday, 7 August 2012
language/Langue Grammaire et tout le reste....
I have had a very busy summer. WAYYY busier then I thought.
I knew implementing Montessori at home was going to be work, but I didn't think it would be *that* much. Granted, it took me a while to really figure out HOW I was going to go about this. I read a lot, and thought a lot about it. but I feel happy with how things are turning out. And it seems to be worthwhile, things are starting to take shape.
Language was the first topic I wanted to tackle. This is not my favourite topic, it is not X's favourite either. I knew it would take me a while to go through this and make sense of it all. I was right. It did take time.
But I am convinced that this is the very best way to learn grammar. I love how hands on it is. I love how it makes grammar fun, and not just very abstract. I am absolutely sure that it will work with X.
I know he has worked with some of it at his school. But not knowing exactly where he is at, I decided to go back to the beginning and review it with him. I'll follow his lead, and stop when he needs it.
So I created grammar boxes, as I have seen in many 3-6 yo albums. I'll start out with this, and see where he picks up.
I have a box for the material seen in 3-6: noun, article, adjective, verb, conjunction and preposition. The rest will be seen with the grammar and grammar filling boxes.
Noun will be the first to go. I know he knows this already, but I'll tackle it with something fun that he is used to.
I tried to put stuff he loves, guys stuff.
But the rest are also all ready to go, loaded with the first presentation.
I used dollar store boxes, and mostly objects that I found in the house.
I printed the label on label paper, so I just had to stick it to the box.
They are all in the grammar drawer, neatly tucked until we start officially:
Here are a few inspiration that helped me created these boxes:
Meg's albums
Info Montessori
Montessori for everyone
Making Montessori ours'post
A fantastic video about Montessori grammar
Libellule's post about early grammar
Cissou's many posts
Nice video here for explanation of grammar solids (I am a visual!)
Since this might go quickly, I am already ready for the next part of this which is the 6-9 presentation of grammar. I'll talk about this in another post, as it will take one on it's own...
You can find the link to the labels at the bottom of the post, but they are in french :)
Lorsque j'ai pris la décision de suivre la pédagogie Montessori pour l'école, je savais que ça demanderai du travail. Mais pas autant que ça. Bien entendu, j'ai cogité longtemps sur la façon que je voudrais qu'on fonctionne, et je crois que mes idées sont maintenant claires à ce sujet. Mais malgré cette réflexion, la production de matériel est prenante...
J'avais décidé de commencer avec le matériel de langue: ce n'est pas mon sujet préféré, ce n'est certainement pas le sujet préféré de X...Et donc, oui, ça m'a pris du temps à lire, comprendre et intégrer tout ça.
Mais je crois que ça en vaut largement la chandelle. Je crois que la grammaire Montessori est LA façon d'apprendre ce matériel d'une façon intéressante, et qui va permettre une rétention à long terme.
Je sais que X a déjà vu certaines de ces choses. Mais ne sachant pas exactement où il en est, j'ai décidé de repartir du début. Au pire, ça ira plus vite au début, et ça lui fera une révision.
J'ai donc monté ces boites de grammaire, qui sont inspirée du matériel 3-6 ans. Allez voir les différents liens que j,ai mis en haut. Certains sont en français, d'autres en anglais.
Je commencerai par la boîte de nom. Je sais que X est familier avec ça. Mais ça permettra qu'il se familiarise avec notre méthode de travail. On verra la vitesse auquel on passera au travers les autres boîtes.
Une fois celles-ci terminées, j'enclencherai avec les boites de grammaires version 6-9 ans. Elles sont prêtes, mais elle mérite un billet à elles seules...
Les boites viennent du magasin à 1$ du coin. J'y ai collé des étiquettes faite dans Word, et imprimée sur des étiquettes 81/2" x 11" et coupée à la bonne dimension.
Les étiquettes sont trouvables ici
La dernière image est celle des boîtes dans leur rangement, prête à être explorées!
Monday, 6 August 2012
Boîtes de phonèmes pour M
English at the bottom...
M va bientôt commencer à travailler avec les phonèmes. Pour ajouter à l'expérience des lettres rugueuses, j'ai fait des boîtes de son pour les phonèmes rugueux que nous avons.
(pour les autres lettre, je lui ai fait des pochettes de son ici)
Je ne voulais pas acheter une boîte à vis pour mettre les objets dedans, j'ai donc trouvé ces boîtes au magasin à 1 dollars. Elle sont parfaites. Je les ai identifié au phonème correspondant à l'aide des étiquettes que vous pouvez voir dans l'image.
Elle rentrent parfaitement dans le tiroir du meuble de français, je ne pouvais demander mieux.
Voilà, toutes prêtes pour travailler.
Si vous êtes intéressé au ficher des étiquettes, il est ici
********************************
I've been working on phonemes lately for M, and have prepared the sound boxes for her. They contain objects that contain the phonemes we are studying somewhere in their name - not only the beginning sound. M is now able to identify all sounds of a word now that she is reading so it is not a problem for her.
The boxes are from the dollar store.
The labels were made with word, and I printed them on sticky label paper. I used primer print.
They all fit beautifully in our language area, and they are all ready to go. It compliments well the sound pouches that I made a while ago.
Thursday, 28 June 2012
phonogram dictionary - Le dictionnaire des phonogrammes
The language part of Montessori is hard for me. The reason is simple, information about Montessori in french are scarce, and translation is not as much as an option as for maths for instance. There are so many difficulties in the french language, it is a world of it's own.
So needless to say that finding a Montessori album in french has proven difficult to do. But with luck, good connections, and perseverance, I finally did. I was anxious to see what were the methods used in french to teach the art of language.
I knew already that the pink, blue and green scheme is not the widely taught method in the French AMI formation. I had seen a lot about " les dictées muettes" which are used a one branch of Montessori (Montessori de St-Nicolas) but this is not what AMI teachers use around here, they use the Murielle Dwyer scheme.
I first came across this scheme while reading What did we do all day. In fact, MBT had recommended me the pamphlet made by NAMTA about language before I found my album; it explains quite extensively this method. It already made sense to me at that point. In fact, I liked this scheme better then the pink-blue-green that I kept reading about and that seemed to complicated to me.
It is not my intention to talk extensively about this scheme, as others have done it already. But I want to talk about one specific part of it.
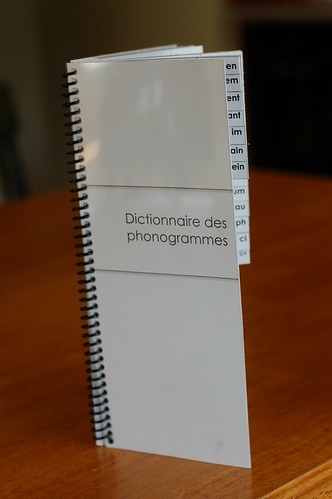
This method suggest the use of a phonogram dictionary, which I thought was genius. Not having seen on in french yet on the web, I thought I'd put mine up.
I printed it on heavy card type card stock, and had it binder with a black spiral. The first and last pages are protected by a transparent plastic.
first page:
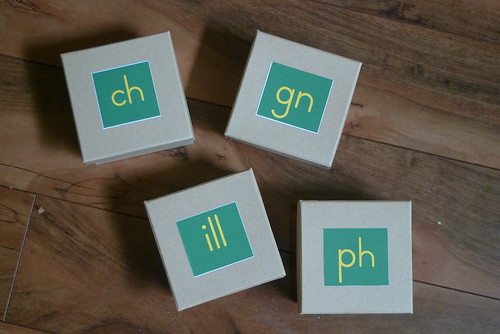
these are the key phonograms that I wanted to have in there. I copied what I had, but looking back, there are 1 or 2 changes that I would have made. (including removing the ill in the key phonograms)
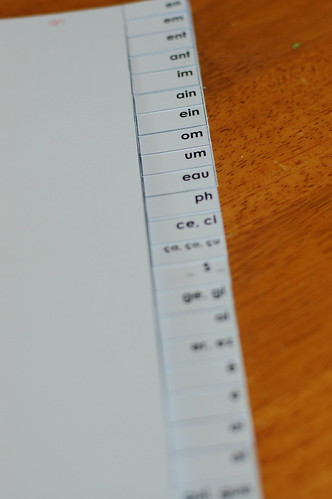
then the following pages are the different graphemes with the sound they make. Si let's say the child gets stuck while reading on a combinaison of letters he is not able to sound, he just goes to the page of this grapheme, and reads the sound this particular combo of letter makes. In this case, the child would have read something that contained "en", and turning to the right page, he would have know that this sounds like "an" which is a phoneme that is learned with the sandpaper letter, a key one.
I think the biggest challenge in making this was to have all the phonograms fit on one page.
X loves it, and has been using it a lot while reading. So far so good.
Si vous faites Montessori à la maison, et que vous n'avez pas suivit de formation, vous connaissez autant que moi la difficulté à se procurer du matériel Montessori en français. J'ai cherché tant bien que mal un album de langue en français, et j'ai bien faillit me découragée quand finalement, j'ai réussi à en trouver un de par les contacts que j'ai dans le milieu des écoles Montessori.
Par contre, avant de réussir à mettre la main sur cet albums, j'avais fait beaucoup de recherches sur la méthode de langue tant en anglais qu'en français. Il me semblait claire que les boites rose, bleues et vertes n'étaient pas la norme, en tout cas pas ici, et que les dictées muettes étaient un façon bien connu dans certains endroits de la France, mais pas ici. J'avais alors tournée mon choix vers la méthode de Muriel Dwyer, une méthode toute simple, et qui fonctionne pour toutes les langues. J'ai donc acheté. son fascicule chez NAMTA, et après en avoir fait la lecture, j'ai commencé le travail de "traduction".
Par chance, l'album de langage que j'ai reçu utilise cette même méthode. Je crois que les formation AMI ici prônent l'utilisation de cette façon de faire. Après lecture extensive, je peux confirmer que c'est la méthode qui a été utilisé par mes enfant dans leur école Montessori locale. (qui est dirigée par une directrice AMI)
L'objectif de ce billet n'est pas de vous expliquer en détail cette méthode. Si vous lisez l'anglais, et que vous désirez en connaître plus sur celle-cil je vous recommande chaudement le fascicule mentionné plus haut: A path for the exploration of any language leading to reading and writing" chez NAMTA.
Cette méthode suggère l'utilisation d'un dictionnaire des phonogramme pour l'enfant qui lit déjà, mais qui a encore besoin d'un coup de pouce pour les divers phonèmes et les sons que ceux ci font. Je trouvais l'idée géniale, et voyait complètement l'utilité de la chose pour X.
J'ai donc fabriqué, en répliquant le dictionnaire de l'album, mon propre dictionnaire des phonogrammes.
J'ai imprimé les pages sur du cartons à cartes de souhait, fait relié le tout avec une spirale, et ai ajouté des plastique devant et derrière pour protéger les pages.
À la première page, j'ai mis les phonèmes clés. Si c'était à refaire, je ferai 1 ou 2 modifications et je ne referait pas si fidèlement le dictionnaire. J'enlèverai, entre autre le ill à cette première page, et je rajouterai le "f" et le "Y"
Les pages suivante sont les différents graphèmes que l'enfant peut recentrer durant la lecture. Si l'enfant ne sais pas lire "en" il se rend à la page identifié par le graphème, et lit le phonème correspondant, dans ce cas, "an". Les phonèmes clé sont appris par l'utilisation des lettre rugueuse vertes.
X adore le dictionnaire, et l'utilise régulièrement lors de ses lectures.
Tuesday, 19 June 2012
Making sandpaper letters
It is not the first time that I make sandpaper letters. At that point, I had chosen to make them with script letters. I guess I felt it was more logical, and also I knew that at the local Montessori school, sandpaper letters were script too. But times have changed, and so the sandpaper letter M is using at school (the aforementioned local Montessori school) . They went from script to cursive at the beginning of the year, making my sandpaper letter not exactly as useful as they used to. And in X's Montessori school, they HAD to write cursive, so that just weight more in my decision to switch from script to cursive.
M asked me to have a set similar then the one at school, and X desperately need to work on his calligraphy, so I figured it was a good investment of my time to make a set for all of these reasons.
** M will be homsechooling with us 2 days a week, so it is important for me to be ready for her too!
I used Libellule's template here which is using this font.
I also used the size she recommended in one of her post: for lowercase: 19x23 cm which makes those sandpaper letter way bigger then the other set I have made.
When I made the previous set, I had made it offset, like the sandpaper letter seen at Neinhuis. The rational behind doing this is that it allows the child to stabilize the letter with the left hand to trace with the right one. In a french Montessori forum that I visit often, there was ample discussion about this. I didn't know where to stand about this until E came along. Since he is a clear left handed child, after the letter offset is not an option anymore, and thus, this time they are centered.
The last time I made sandpaper letter, I had use very thin plywood. Not being a woodworker, and not wanting to use too much of my credit to my DH (who will have TONS of things to do soon enough), I decided to make them out of thick cardboard. I used 3 sheets, at 4 $ a sheet. I painted with the acrylic colours I had already used for the other sandpaper letter, so this project was not very expensive overall.
I used 220 sandpaper, and glued it with carpenter's glue as I felt standard white glue was not enough.
It takes multiple sitting to make those because of the paint.
IMO, they are worth making instead of buying.
Ce n'est pas la première fois que je fais des lettres rugueuses. Le premier set que j'ai fait utilise des lettres script. Mais les temps ont changés, et mes enfants ont fini par apprendre(sont en train...) le cursif, et je trouvais donc important de m'adapter à leur réalité.
J'ai donc décidé de refaire une série de lettre rugueuse, cette fois en cursif, au grand bonheur de M qui est en plein apprentissage de la lecture et de la calligraphie.
La dernière fois, j'avais utilisé du bois mince pour les plaquettes. Comme je ne suis pas une amatrice des outils motorisé, et que j'ai une liste de projet autre pour mon travailleur du bois...j'ai décidé de lui faire grâce de ce projet, et de travailler plutôt le carton.
J'ai choisi 3 grande feuilles de carton très solide dans mon magasin local d'art. J'ai coupé le tout avec un cutter de type gproc. J'ai utilisé les dimensions que Libellule propose qui sont beaucoup plus grande que celle que j'ai utilisé avant. (19x23cm)
J'ai peinturer le tout avec la peinture acrylique que je possédait déjà.
Pour les lettres, j'ai utilisé le matériel de Libellule, qui est fait à partir de la police Cursive Standard.
On trace les lettres À L'ENVERS sur le revers du paper sablé (j'ai pris du 220 vendu à la feuille), et on coupe. Ce processus va déséguiser vos ciseaux!
J'ai collé les lettres avec de la colle blanche, mais j'ai rapidement trouvé que le résultat n'était pas optimal, alors j'ai utilisé, encore une fois, de la colle à bois.
Lorsque j'ai produit la première série de lettre, je m'étais inspirée des lettre de Neinhuis, qui met la lettre de façon décalée sur le carton. Ceci est basé sur le fait que l'enfant, de cette façon, peut stabiliser la lettre avec la main qui ne trace pas. J'ai lu plusieurs discussions sur le sujet, et je ne savais pas trop sur quel pied danser. Mais avec l'arriver de E, qui est clairement gaucher, la question ne se pose plus, cet cette soit, les lettre sont centrée sur les cartons.
À mon avis, ça vaut la peine de faire ce matériel plutôt que de l'acheter.
Saturday, 16 June 2012
Handmade Montessori
![]() |
making sandpaper letters |
In the last month or so, since this idea of homeschooling came back in our discussions, I have been thinking about the how. How am I going to homeschool? What do I want my days to look like? And most of all, how do my child (X in this case) learn? It is important for me to make sure our learning style fits my son's need, but also mine. I want the both of us to be interested, to make sure we have a fulfilling year.
Well, ok, yes, Montessori kinda came to mind as being the obvious choice. X being what he is, he needs hands on learning, a continuum from concrete to abstract, he has done so well in Montessori for so many years now, and so, of course, we'll mainly be sticking to this route.
But as I was starting to mentally plan how this was going to happen, I started to have this sense of uneasiness inside me. One that I have felt before, and at this point, I knew very well what it was.
Anybody who knows a little about Montessori knows that material is an integral part of the method. Loads of material actually. But, being what I am; simplicity being at the root of my life, I still cannot imagine having a room full of Montessori material . I just don't feel comfortable with that, I never have. It actually led me to researching other ways of homeschooling that would make me feel less trapped into material and tied to the price tag that comes along with all that. My researches were not useless as I have started reading on a philosophy that was unknown to me before and that I will try to incorporate in our days (more on that later). But the fact remained that Montessori was the best fit for X.
I came back to this book, and I came back to this post that I wrote what seems like ages ago, and I worked through my uneasiness to find what we work for us. For X and also for I.
I have come to the conclusion that we will not be doing pure Montessori homeschooling. We'll adapt the method to fit our life choices and make it ours. I will not buy the whole shebang that goes with it. I just can't. It is too much stuff, well made, and very well thought and intended stuff by the way, but still is stuff.
And so while I keep on tuning plans in my head, I started making Montessori. The homemade way. It does take time, but I feel it is a good lesson for my children. Good work pays off, and there are other way then the easy "wallet way". I like that they are included in this process, and see the work making all this implies. I think it makes them more aware of the value of this material, and they have a greater respect for it.
I also feel better knowing that I am using recyclable material that I won't mind either passing on or recycle for it to become something else.
That really eases my mind.
Depuis que le sujet de l'école maison a refait surface ici, j'ai passé des heures à réfléchir au comment. Comment allons nous faire l'école maison? C'est important pour moi que les méthodes que nous emploierons soient adaptés à X, mais qu'ils nous plaisent à tous.
Comme de raison, la méthode Montessori semble être, a prime abord le choix facile... X étant le petit garçon qu'il est, avec le style d'apprentissage qu'il a, Montessori lui a comme un gant, depuis toujours au fait. Et c'est pour cette raison que nous continuerons de suivre ce chemin.
Mais pendant que je faisais cette gymnastique mentale de préparation, je me suis mise à ressentir ce sentiment d'inconfort, un sentiment que j,ai déjà eu précédemment, et que j'étais, cette fois-ci, en mesure d'identifier.
Quiconque qui connaisse la méthode Montessori sait qu'elle nécessite du matériel: celui-ci est la pierre d'assise de la méthode. Et pas juste un peu de matériel: beaucoup de matériel. Étant ce que je suis, une minimaliste qui étouffe dans le trop, je ne peux toujours pas m'imaginer avoir une pièce complète remplit de matériel sur tout ses murs. Je ne suis pas confortable même a y penser. Et ceci m'a même amené à investiguer d'autre philosophies d'éducation maison qui conviendrai à nos besoins. Mes recherches n'ont pas été vaines, j'ai en effet trouvé une philosophie que j'aimerai intégrer en partie ici (j'y reviendrai plus tard) mais le fait est que Montessori est la méthode qui semble le meilleur choix pour X
J'ai donc du gérer ce conflit de matériel vs méthode. je suis retournée à ce livre, et à ce billet que j'ai écrit il y a des lunes il me semble, et j'ai pu venir à une conclusion.
Nous ne seront pas des Montessorien purs dans notre façon de faire l'école maison. Nous adapterons la méthode à nos choix de vie. Nous ne possèderons pas l'entière totalité du matériel Montessori, je crois qu'il est possible de faire avec des éléments choisis. Après tout, nous ne sommes pas une classe Montessori, mais nous suivons la méthodologie Montessori.
Et pendant que je continue à me faire une image mentale claire de ce que nos jours seront, j'ai commencé les préparatifs du matériel que nous utiliserons. Montessori version maison. Je suis satisfaite de ce choix, et je crois que ça enseigne des leçons importantes à nos enfant: la valeur du travail, la valeur de l'argent. Comme ils participent de près et de loin à la fabrication de ce matériel, ils voient le travail que ceci implique, et ont un plus grand respect pour le matériel que nous mettons sur les tablettes.
Nous utilisons des matériaux locaux autant que possible, et surtout recyclable. De cette façon, nous pourrons transmettre ce matériel à une autre famille intéressée de l'utiliser, ou nous pourrons le recycler pour en faire quelque chose d'autre.
Je me sens définitivement mieux.
Wednesday, 28 March 2012
using the letter pouches
They have been finished for a while now, and the kids have had the time to play with them a lot.
They are intended to be used just like an alphabet box. But again, each of my little ones is using them for their own purpose.
E (20 months old)
He loves to empty and fill the pockets. But I think his biggest pleasure is to explore what is in there.
Since he is in a very verbal state, he often asks me the "name" of the letter, and so I sound the letter he shows me to his great pleasure. I often hear him saying sound now.
M 4 1/2 yo:
She is the one I had in mind when making this. And she is using it the way I had in mind.
She gets a couple of pouches out, explore what is in them, sounds all of the words of the items. There is usually 5-6 items in each bags. She loves it.
She is also using them as sensory pouches. When I make a rotation of what is in there, she loves to find out what they contain by trying to guess what she is touching. Of course, she has a good clue (the first letter) but it sometimes still hard. This is such a fun game!
She LOVES looking at all the letter at the same time, she loves touching them (she is working very hard on her sand paper letters recently), she traces the letters frequently. I know she is wishing for these to be stored in her room. She asked me several time.
X 6 1/2 yo:
He loves to participate in the guessing game too. But what he mostly does with those is to practice writing. He gets an item out, and write it's name on a small piece of paper.
He has also started to ask me to make a kind of a grammar game with it. (Mommy, this is LA souris, and LE saxophone right?, La souris est AU DESSUS du saxophone...) So I can see that is use of it will change soon
I cannot wait to be able to fetch a long piece of wood to hang them on there. I'll need to wait a little bit more until the wood has finally dried. That leaves me a little time to figure out where they will be hanging
Monday, 20 June 2011
Making a object permanence box with interchangeable lids

I used a wooden CD box found at my local craft store (in the painting section)
- I removed the hinge lid to keep just the base of the box. I thought about using the cover to make a drawer, but I just didn't have enough time to make it work.
- I used a saw to make the a rectangle in one of the sides of the box. This is the place where E can retrieve the ball (or form). Make sure that the rectangle you cut out is big enough to enter a hand and get it out with the shape in hand (I almost made it too small!)
- then I nailed (with finishing nails and a nail gun) some narrow wooden sticks (found at the hardware store) just near the upper side of the box. These are necessary to hold the interchangeable lid in place within the box.
Make sure you leave a space between the wooden sticks and the edge of the box for the cardboard to fit in the box. You don't need a big space, just to cover the thickness of the carboard (so that it lays flat vs the edge):
On one side, I sanded the egde all the way to the wooden stick so that my cut piece of cardboard will be able to slide in and out (this is what will allow me to have an interchangeable lid). I used a rough piece of sandpaper to sand the whole area. I sanded the front of the box, but I could have make this in the back.
- then I just cut a square piece of cardboard using the dimensions of the inside of the box, using an x-acto and a self healing mat and I also cut out the shape in the cardboard and now my box looked like this after putting this piece on the top of the box:
(It could be used that way, and it was for a couple of days, but since the cardboard lid is not fixed and just put on, I wasn't happy with it. So I managed to find a way to fix it there.)
Using the self healing mat I made a 2 cm large square, using the dimension of the OUTSIDE of the box
and I nailed it over the top of the box:
(note: on this picture, the square is not nailed yet, but it is placed correctly)
THis last piece of cardboard holds the interchangeable lid in place, and soE cannot remove it as he was doing at first. So now he can concentrate in really putting the shape in the hole. the interchangeable piece of cardboard (the one that is under) can slide out in the front of the box: this is the side I had sanded. **Don't forget NOT to nail this side of the box with your square piece!**
I have 2 other shapes ready to be used:
and I am planning on making more lids, with multiple shapes on them
I am super happy with the result and E is over the moon with this activity
Tuesday, 12 April 2011
Texture book
Mon petit dernier adore toucher dernièrement. Toucher tout, toutes sorte de textures, et bien entendu, les mettre dans sa bouche :)
Not being in love with the texture book on the market, where you feel fake fur or fake crocodile skin, I rather have a book with just texture that are not associated with something else that is not entirely true. And so came the texture book idea.
N'étant pas une fan des livres de texture qu'on retrouve présentement sur le marché, je préfèrais quelquechose qui n'associerai pas une texture fausse à quelquechose ex.: de la fausse peau de crocrodile à une image de croco.) Alors, l'idée m'est venu de créer un livre de texture qui n'associerai pas les textures à une image, mais qui ne serai seulement ce que c'est: des textures.
For this one, I used fabrics. All sort fo fabric of a similar color in order to isolate the touch feeling (otherwise you get color and touch). Granted it is not perfect, as it is rather hard to find all similar color fabric in a variaty of texture, but I am still happy with the result
Alors pour le livre, j'ai utilisé des tissus. (J'ai tellement d'autres idées dans le même genre, il y aura certainement une prise 2) CE sont tous des tissus différents ou point de vu du toucher, et j'ai tenté d'isoler cette variable en essayant de faire disparaitres les autres. Tous les carrés ont la même formes, ils sont tous (à peut près) de la même couleur, et sont cousu de la même façon dans le livre.
I found a little cloth book at a scrapbook store near by.
j'ai trouvé un petit livre de tissu dans un magasin qui vend des produits de scrapbooking près de chez moi
I removed all the metal things that were hasardeous,(the book was binded with rings) and cutted little rectangles of fabrics.. I sewed them at the same time ( so you have to be rather precise in positioning the swatches so that the sewing lines are straight) with my sewing machine.
Après avoir enlevé tout les petits morceau de métal qui pouvait être dangereux, J'ai cousu les petits carrés de tissus à la machine, recto et verso en même temps. Il faut donc être très précis quand au placement des carrés pour que les lignes de couture soient droites.
Then I added bows to bind the book and voila.
J'ai attaché le livre avec des boucles, et voilà
I used many fabric: coton, linen, velvet, silk, rayon, wool, burlap, hemp (fleece) , corduroy, coton terry
J'ai utilisé plusieurs tissus: cotton, velour, soir, rayonne, laine, jute, Chanvre, velour côtelé, ratine

instant succes, he loves patting the pages, and of course, putting it in his mouth. His sceal of approval I guess.
C'est un succès assuré, il adore toucher les pages, et surtout, les mettre dans sa bouche...
Sunday, 13 February 2011
Artwork for the little child
Walls are the best canvas to display items we want children to look at. In a time when they are so open to the world, showing them part of it, and allowing them to touch really makes a lasting impression into their brain. THis is one of the reason I love the discovery basket so much. But I was looking at some other way to expose part of our world to Pumpkin, and after seeing those gems made by Pi'lo (I adore her work!), I knew I had found exactly what I needed to expose more fragile things, or other items I don't want Pumpkin to play with (but still want him to be able to look at)
Les murs sont un excellent médium pour permettre d'afficher des choses (art, objects, photos) permettant à l'enfant de les regarder. Dans un moment de leur vie où ils sont si ouvert à leur environnement, leur permettre de voir et toucher des éléments de leur environnement influence leur développement. C'est une raison qui me fait aimer le panier à découverte. Mais je désirais trouver une nouvelle façon de présenter des objets à mon fils, sans les mettent dans le panier. C'est en visitant le site de Pi'lo que j'ai vu le médium parfait!
The small object canvases
Les canvas de petits objets:
they are easy to make, and open a realm of possibilites to showcase new objects to a little child.
Ils sont facile à faire et permettent des tonnes de choses que je n'aurai pas cru possible... (comme mettre des coquillage dans la chambre de É!)
I choose items that started with the same letter for these.
J'ai choisi des items commençant avec la même lettre
To make them, I used:
6x6 canvases
clear vinyl thread (it has to be rather thick)
and a set of stamp and ink
Matériel:
Toiles (pour la peinture) 6x6
du fil en vinyl assez résistant
Étampes et encre
All you have to do is attach securly the item on the canvas, and stamp the name underneath it. Voilà.
Attacher les items de façon sécuritaire sur la toile, et estempiller le nom en dessous...voilà
**Make sure you use items that cannot be really dangerous if they manage to remove them from the canvases (i.e. little items that could be swallowed).**
ATTENTION de n'utiliser que des choses que ne peuvent pas être avalées si elle sont malencontreusement décrochées!
I hung them on his wall, at a low height for him to enjoy and touch. I made sure that they are hang tightly, so he is not really able to take them down.
Je les ai accrochées sur le mur à sa hauteur, m'assurant qu'ils sont accrochés pour qu'ils ne puissent pas être enlevés.
I showed him how to touch the shell and stone, and I have seen him go near and pat them gently a few times already.
Je lui ai fait une "présentation" sur comment les toucher, et je l'ai vu aller les regarder quelques fois déjà.
Wednesday, 30 June 2010
Homemade material - sandpaper letters
Keeping in the same line of subject today. The sand paper letters.
I wondered for a while how I would make those. I knew I wanted them made on wooden boards, but at the time, that was it.
I found some really thin wooden board at my local art shop. In the watercolor section. SO I bought that and had DH cut them into 4 squares, so I didn't need all that much.
Then I painted those boards with acrylic paint that I also bought there. I used the same red and blue that I did for the red rods and the numeral rods. I created the pink with a dash of white. I started by painting only one side, but was not happy with the end result, so I ended up painting both side, and I am happy that I did. It makes a neater job IMO.
Once the paint was dry, it was time to add the letter. I had different options:
1- apply glue and pour sand over it to create the letters
2- Used sticky felt
3 go the longest way and use sandpaper.
After weighing all the options, I decided to go the "real" route, and use sandpaper. I do not regret one bit this choice, even though it took longer.
SO I used 220 sandpaper. I could have used softer, but that was what I had on hand. DO NOT GO LOWER THEN THAT THOUGH, it is too rough for little hands.
I cutted the letter with a exacto and a self healing board. Then I glued them with carpenter glue. This does a wonderful job of sticking the paper!
I finished with a slight coat of Mod podge, but I didn't pass over the letters for fear that they would not have the necessary tactile feeling anymore. I think I could have done it though without problems.
So here is the finaly result:

I organized them in a basket, I couldn't find any wooden boxes that would fit them in, and that allowed me tu reuse things I had on hand.

I am super happy with the result, and I don't feel the need to get already made sandpaper letter. (which is an indicator for me of my level of satisfaction ;)
I did see some really nice handmade ones though. So if you don't feel like making them, but would rather have something homemade, these would be a very nice choice. Otherwise, this is a fun but I admit time consuming project. YOu cannot do this in one seating, because of the paint...
HTH :)
Tuesday, 29 June 2010
Homemade material - The Seguin tables
As I was cleaning the basement, I realised that some material I made never was showed here as a final product.
Seguin Tables:
THis was a fun project that I really wanted to make for Pea as he is really into math. He is not quite redy yet to work with it, he is still in the stage of the beads, but the time is almost there.
So here they are: The teen boards


I made the boards per se with the same technique as I did for the numeral cards
I finished them with a light coat of varnish, as I was not entirely happy with the mod podge finish (it is a little sticky).
Voilà :)
Saturday, 17 April 2010
The sensorial shelf
It is ready. Everything is finally here.
I have a few things to print laminate and cut...(print laminate cute, print, laminate cut...does that remind you of anything?) but that is it. Practical life and sensorial are ready.
Here is the sensorial shelf:

(head on to flickr I have sevral notes explaining what is where)
I bought these shelves a while ago at IKEA in the "as is" section. Nothing was wrong with it, it was a demo. I have always used it to put the kid's stuff in it. And now, it is serving it's purpose perfectly again for the sensorial section: low enough for the younger to be able to reach the material, and has just enough room for everything without being too big. That was one god buy.
I will now be working on the math and language shelves. I am wanting to look for bookshelves that we will be able to use later on for something else, and that is a tad higher, since the very young (i.e. our soon to be 3rd baby...) won't really have to have access to these for a while.
After a good look at IKEA, I am thinking about those:

Where the lower shelves are large and long enough for larger items, and the higher spots can be use by me to rotate or organize other things.
Otherwise I am thinkg this:

that is very cheap, and could be reused in an office, garage or storage room. There are lower shelves possible with this...
Both are made out of real wood, which is one of my first criterias...There are otherwise beautiful bookcases (lack and expedit) but they are particule panels, and I don,t want that in my house. I know that kinda limit my choices...
I cannot wait to have them done, although I still have a while to go. Some material needs to be done, and other to buy (think beads here...)
I have a few things to print laminate and cut...(print laminate cute, print, laminate cut...does that remind you of anything?) but that is it. Practical life and sensorial are ready.
Here is the sensorial shelf:

(head on to flickr I have sevral notes explaining what is where)
I bought these shelves a while ago at IKEA in the "as is" section. Nothing was wrong with it, it was a demo. I have always used it to put the kid's stuff in it. And now, it is serving it's purpose perfectly again for the sensorial section: low enough for the younger to be able to reach the material, and has just enough room for everything without being too big. That was one god buy.
I will now be working on the math and language shelves. I am wanting to look for bookshelves that we will be able to use later on for something else, and that is a tad higher, since the very young (i.e. our soon to be 3rd baby...) won't really have to have access to these for a while.
After a good look at IKEA, I am thinking about those:

Where the lower shelves are large and long enough for larger items, and the higher spots can be use by me to rotate or organize other things.
Otherwise I am thinkg this:
that is very cheap, and could be reused in an office, garage or storage room. There are lower shelves possible with this...
Both are made out of real wood, which is one of my first criterias...There are otherwise beautiful bookcases (lack and expedit) but they are particule panels, and I don,t want that in my house. I know that kinda limit my choices...
I cannot wait to have them done, although I still have a while to go. Some material needs to be done, and other to buy (think beads here...)
Monday, 12 April 2010
Finishing the teen/ ten boards
I had a little bit of spare time to work on those this weekend.
I was planning on trying to stamp the numbers on the board and wooden chips. So I used the number pattern provided by JHJ publishing (although I am not sure that it is still available since the site has changed) for the small number cards. THe font is primer print.
Using a carving technique seen here I copied the letter on a carving pad, and carved them. It was easy enough, and I was rather satisfied with the results. But when I started stamping them with the acrylic paint I had, I wasn't impressed with the results. The lines weren't as clean and well defined as I wanted them to be.
So I had the idea from here to use a ink pen. So I went to a local art store, and ask the salesperson a good ink pen to use on wood. She wasn't really sure that this would yield the results I wanted, she thought the ink might run and make a fuzzy line. So she suggested this instead:

which works like a charm.
So I exactoed the JHJ publishing pattern ( again, the small number cards) , and then drew the numbers on the wood using the "pochoir" method:

and with no running whatsoever.
The lines are sharp and clean, just as I wanted them to be.
It dries quickly, and since there are differents types of point, you can have sharp or larger depending on what you need.
The only thing left to do is to seal this, so that the paint doesn't chip.

I have been using Mod podge for the red rods, and I really like the results. And since it is non toxic, I like it even better. So I will be using it again to seal the boards and pieces that goes with it. I plan to use it with a small paint brush.
Hopefully this will be done by the end of the day...
I am please to report that we are almost ready to go. Of course, you are not always completely ready when homeschooling, a concept that I am clearly understanding, but the basis, on which I wanted to start, is almost done. Good thing, because this belly of mine is also getting bigger...
Subscribe to:
Posts (Atom)