
I wondered for a while how I would make those. I knew I wanted them made on wooden boards, but at the time, that was it.
I found some really thin wooden board at my local art shop. In the watercolor section. SO I bought that and had DH cut them into 4 squares, so I didn't need all that much.
Then I painted those boards with acrylic paint that I also bought there. I used the same red and blue that I did for the red rods and the numeral rods. I created the pink with a dash of white. I started by painting only one side, but was not happy with the end result, so I ended up painting both side, and I am happy that I did. It makes a neater job IMO.
Once the paint was dry, it was time to add the letter. I had different options:
1- apply glue and pour sand over it to create the letters
2- Used sticky felt
3 go the longest way and use sandpaper.
After weighing all the options, I decided to go the "real" route, and use sandpaper. I do not regret one bit this choice, even though it took longer.
SO I used 220 sandpaper. I could have used softer, but that was what I had on hand. DO NOT GO LOWER THEN THAT THOUGH, it is too rough for little hands.
I cutted the letter with a exacto and a self healing board. Then I glued them with carpenter glue. This does a wonderful job of sticking the paper!
I finished with a slight coat of Mod podge, but I didn't pass over the letters for fear that they would not have the necessary tactile feeling anymore. I think I could have done it though without problems.
So here is the finaly result:
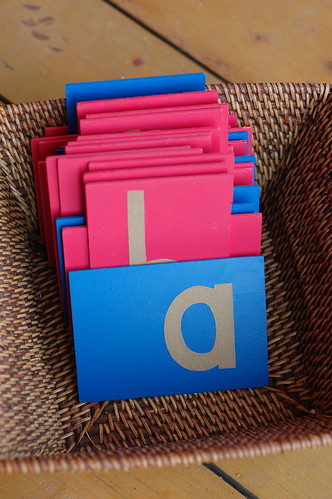
I organized them in a basket, I couldn't find any wooden boxes that would fit them in, and that allowed me tu reuse things I had on hand.

I am super happy with the result, and I don't feel the need to get already made sandpaper letter. (which is an indicator for me of my level of satisfaction ;)
I did see some really nice handmade ones though. So if you don't feel like making them, but would rather have something homemade, these would be a very nice choice. Otherwise, this is a fun but I admit time consuming project. YOu cannot do this in one seating, because of the paint...
HTH :)
Great work! I've been wondering if you are planning to make the Geometric cabinet...
ReplyDeleteTHanks! :)
ReplyDeleteI tried. And really, that fell under my "better to buy already made" list.
I tried with a variety of things. Foam, foam poster boards, paintboard, cork board, and any of those didn't give me the results I was hoping for. I think that the best way to do it is either having somebody that is very skilled with wood, or do it with plastified forms. But I didn't go that route since this is a sensory material, and I felt like feeling the edge of plastic was not as interesting as having something made of wood that is thicker...So I settled to buy this one.
I have an award for you:
ReplyDeletehttp://sporschool.blogspot.com/2010/07/few-items-of-business.html
Oh gee! THanks so much!! :)
ReplyDelete